Sunday, October 27, 2013

Pumpkin Mike Wazowski

Here is another DIY piece of Monsters University decor that tied the theme together with Halloween. My little sister and I made Mike Wazowski out of a pumpkin.


For those of you that don't know Mike Wazowski is the little one eyed green guy that starred in Monsters Inc and Monsters University along with Sully the inspiration for my DIY piñata. You can find the post with detailed instructions here.


I started with yet another fake pumpkin that we purchased last year after the holiday season.


I then spray painted it with some left over spray paint that a friend had leftover from a previous project. I love free craft supplies! There was just the perfect amount to finish covering the whole pumpkin.


My sister then painted the face on the pumpkin. 


A simple and easy addition to our Monsters University Party decor. It is also a great addition to our Halloween decorations that we can use again and again every year.

Friday, October 25, 2013

My adventure in party planning

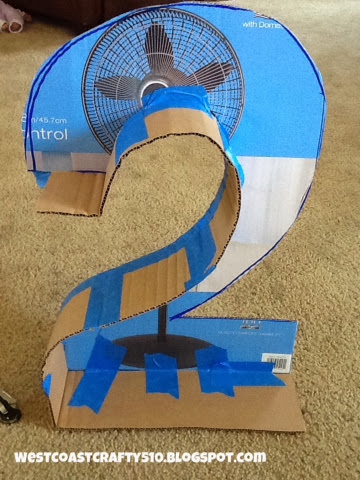
This month I took on the rather daunting job of planning and hosting my daughter's second birthday! I can't believe my baby is two! I tried to keep things simple, but I got a little bit away from myself. During a bout of pinning I came across a pin of how to make your own piñata and thought "that doesn't look that hard." So I decided then and there I would make the piñata for my daughter's party. Truth be told it was very easy just very time consuming. Here are step by step instructions for how I did it.


Here is the finished product!

The theme was Monsters University and costumes were encouraged. I love that my daughter's birthday is in October and a costume party seemed perfectly logical! I also created both of my daughters and my costume with some help from my sisters, but that is for a later post. This piñata was inspired Sully of Monsters Inc and Monsters University. He is the big blue and purple monster.


Step one: 
Find a cardboard box as big as you want the piñata to be.


Step two:
Trace the shape of the piñata on one side. I chose to do the number 2 because it was my daughter's 2nd birthday.


Step three: 
Cut through both sides of the box to create two cut outs of the shape of the piñata.


Step four: 
Cut several strips of cardboard that are the same width and begin taping them to one side of the piñata to create a three dimensional shape.


Step five:
Continue taping the inside, but don't do the entire shape or you won't be able to tape the inside for the back side of the piñata.


Step six:
Begin taping the back of the piñata to the strips that are attached to the front of the piñata.


Step seven: 
Continue taping strips of cardboard all around the remainder of the shape until completed. Don't forget to leave an opening to fill the piñata with candy.


Step eight:
Paint the entire piñata the base color. I used spray paint to make it a quick job.


Step nine:
Begin cutting strips of tissue paper and cutting fringe into the strips and glueing to the piñata.


Since I was modeling this piñata after Sully of Monsters Inc. and Monsters University it was blue with lavender spots. I cut lavender paper ovals and glued lavender tissue paper fringe to them and glued it to the piñata.


Keep on covering the entire piñata with tissue paper fringe until completely covered.


Step ten: 
Fill with candy. Don't get too emotionally attached since the point of the piñata is to beat it to a pulp to get to the candy. Enjoy!


Wednesday, October 16, 2013

No Carve Pumpkin

Hello there! Guest blogger here! My name is Chantelle. I am Antoinette's little sister. We are in the process of creating a sister blog but in the mean time I had something that I wanted to share right away since it is the season for carving pumpkins! 

This post is a work in process, but we wanted to give you all a sneak peek so you can get your pumpkin decorating on! This is a pumpkin decorated with gold thumb tacks.


Here's what you need:

Thumbtacks. Purchased from the 99 cent only store.


A pumpkin. This is a fake one we got on sale last year after the holiday season. 


Printed out random font monogram


Tip: if you don't have carbon transfer paper or don't want to pay for it just shade with a pencil on the back side on the lines u are going to trace.


Tape it onto ur pumpkin and trace the letter. It doesn't have to be perfect just there as a kind of guide


Here you can see a light pencil outline.


Begin sticking in the thumbtacks.


Wasn't sure what my intention was I just got started pressing the thumbtacks into the foam and found that it looked pretty cool when they were overlapping just a bit like scales


Just kind of work ur way around filling in the letter and if u don't like the way the thumb tacks are laying on top of each other it's easy enough to move them around


Try to cover up ur old holes as much as possible, but they are really so tiny you can't even notice them. However, it may be because I'm using a black pumpkin, but still u can't even tell. If you're using a painted pumpkin then u can just touch it up with the same color paint


Finished. A really fast and easy project. The whole process took about only 30 minutes. 

Some variations could be made using different colored pumpkins. You could also try spray painting the heads of the tacks different colors. 

If you decide to do this easy project I would love to see your pumpkins. Email them to antoinetterbrown@gmail.com and I might feature them in this post!

Happy crafting!

Friday, October 4, 2013

Shutterfly my favorite photo site and app

I got this wonderful personalized card free from Shutterfly by being subscribed to their emails. They always have great free deals. My favorite is the free 101 4x7 photo prints. You pay for shipping, but I have the Shutterfly app on my phone and iPad so it makes printing all my pictures so convenient and easy! I like to keep my free cards generic so that I can use them for anyone. Love the deals that they have on photobooks and custom photo projects!


5x7 Folded Card
View the entire collection of cards.

Thursday, September 26, 2013

Reading is what I do!

So I just finished this book and decided to write a review of it. Since the goal of my blog is to get me writing more I figured I'd share it with you all.

Check out this book on Goodreads: The Great Bedroom War (Return to Redemption, #2) http://www.goodreads.com/book/show/15758012-the-great-bedroom-war

"I think this book is a great example of chick lit. It has just the right amounts of romance, conflict and sex. It's not explicit like some romance novels are, but it has just enough sex to keep it interesting.

It can be confusing who's who at times, but I just have to stop for a fraction of a second and think wait who's Haley again and then it clicks. I have been thinking of creating a little family tree of sorts to remind myself who's who in the town of Redemption. Kind of like a residence listing with a short description of who they are. So-n-so is so-n-so's sister who passed, parents are... and is tutoring/dating so-n-so. So-n-so is the HS guidance counselor. Wish me luck in finding time to do that!

I have really fallen in love with this town of Redemption. Laurie Kellogg's intricate and involved storylines make it realistic. It's never just one bad thing that happens at a time in real life and Kellogg doesn't shield us from the drama of the "real life" of Redemption. I like how she alludes to a past history and just gives us a taste so I'm eager to keep reading and find out just what did happen! The flashbacks don't take away from the story they are like puzzle pieces being fit into the big picture.

All in all, a good quick read! I'm glad I got this as a free download and I'm happy I took the time to borrow the first book in The Road to Redemption series A Little Bit of Deja Vu, also a good quick read. Now it's on to The Parent Pact."

Tuesday, September 3, 2013

Water

I am trying desperately to increase my water intake and I have found the solution! Flavor infused water. Don't get me wrong I like plain water. I could drink it out of the tap, I'm not picky. I just have a hard time actually grabbing a cup filling it and drinking it. So I decided to make infused water to motivate me to drink. I got the idea to make naturally infused water on a recent trip to Trader Joe's. By their sample station they had a big hug filled with orange and strawberry slices. I, of course, sampled it. It had a light orange flavor with a hint of strawberry aftertaste. So I ran back over to the fruit and grabbed an orange, I had just gotten strawberries from the farmer's market. The secret to making it look pretty when making fruit infused water is ice! Loads and loads of ice. In hindsight, I would have filled the whole container with ice.

Step one: Cut up orange and strawberries. At this point I realized I didn't have enough orange so I cut up a lemon as well.


Step two: Put a layer of ice in your container depending on the height of your container. I put about two inches because I used a big container. 


Step three: Add a layer of sliced strawberries around the outside of the container creating a circle with the slices flat against the glass, to make it pretty.  :)


Step four: Add more ice behind the layer of strawberries, just about an inch of ice. 


Step five: Add a layer of oranges or lemons in the same manner as step three, to make it pretty. I alternated lemons and oranges to give a little extra visual appeal. 


Step six: Add more ice to the top of the orange or lemon slices.

Step seven: Repeat steps 3-6 if you want to. I stopped here. 

Step eight: Fill the rest of the container with ice and then fill in with water. 

Step nine: Drink and enjoy!

I think the number one motivating factor to drink it all, for me, is to drink it all before the fruit goes bad. It's working! I drank half of the container which I believe is almost 2 gallons!

Friday, November 2, 2012

10%

It feels really good to say that 10% of my body weight is gone! And it's never coming back! I mean never! You might say, but wait what if you get pregnant again? Well I know that it is possible to get pregnant and gain only what the baby weighs. I've heard its been done before and as determined as I am to lose this weight I am determined to keep it off! I won't be having another baby for at least another year or more so I know I will lose a lot more weight and maybe even be at my goal weight before I go for another.
I was at the mall last week and decided to get my wedding and engagement rings resized since they are getting loose. I fully intend on losing a lot more and that will be one more motivation to not gain the weight back.
The key chain is a 10 to celebrate my 10% and the clapping hands with a 16 is my stay and succeed award for sticking with WW for 16 weeks
10%! It sounds so crazy it's like I just cut one tenth of myself off. This is 10% since I started back at weight watchers. If we go back to when I first started WW in 2009 I've lost a little over 20%! Then if you count all the way back to my heaviest I've lost 22.5% :-) If you are good at math and go back and read some of my older posts you can figure out what my past and current weights are.
I can't give all the credit to Weight Watchers, last time around, before babies I was using the original power 90. This time I've been working out with Shawn T and doing Insanity and Hip Hop Abs. I'm feeling good about my health and where I'm heading! Another super accomplishment is that I am now at my lightest since college! Woop Woop! Just wanted to give myself a little pat on the back there.