Tuesday, October 29, 2013

Monsters University Costumes

My little sister is incredibly talented, so are my big sister and myself, but lil sis thought up and carried out the idea to create custom stencils for our Monsters University costumes. Check out these great costumes that were put together with simple shirts and Greek letters stenciled on and some fancy headgear made with dollar store supplies.


My girls and I are sorority sisters from the sorority PNK, Python Nu Kappa.


I couldn't find plain pink shirts on short notice so I dyed some white shirts pink. My lil sis made the stencils and we painted the letters on together. It was a simple process. I wish I had done step by step pictures. I think I'll have to revisit that craft again. I sewed the skirts and leg warmers and paired it with pink leggings.


My dad was in the fraternity OK, Oozma Kappa. 


I really wanted him to grow out his mustache and be Don Carlton, but apparently mustaches don't grow in overnight!


Here are my sisters! Big sis, on the left, isn't in a sorority, but she is clearly a college student at MU! Lil sis, in the center, is in HSS, Etta Hiss Hiss. She has pink and purple streaks in her hair and pink and purple dots all over her.


My husband is definitely not the fraternity type of guy, but he does attend MU and is wearing the shirt to prove it. He is modeling another of lil sis's creations. I wish I had a better picture of him wearing it. It says MU. I think I'll just make him wear it one day and snap his picture. ;) 


The below picture could totally be in one of those "When you see it..." feeds. LOL


AJ is part of ROR fraternity, Roar Omega Roar.


And last but not least is my mom!


She was in the sorority EEK, Slumga Slugma Kappa.


Thank you so much Chantelle for all your help. Everything was amazing!

I love my family!


Sunday, October 27, 2013

Monsters University Party


I am so proud of all the decoration and prep I did for my baby girl's second birthday I just had to share it with you all. It was a combination of homemade and store bought.


My sisters and my mom helped out a lot and made my vision of a Monsters University Party come true.


The tissue paper pom poms were made by my mom from left over tissue paper from birthday presents and the piñata I made. See the post about how I made the Sully inspired pinata here.

My sister and I made the Pumpkin Mike Wazowski. See the post about it here. I also painted another pumpkin pink to make the display a little girlier.


The Monsters Inc M doubled as Monsters themed and an M for My daughters name! This was so simple and my sister made it out of plain poster board. It was the perfect decor for the front door.


We had a costume party and I decided that my girls and I would be Sorority Sisters from the sorority PNK.


I sewed the skirts and boots. I couldn't find plain pink shirts on short notice so I dyed white shirts pink and my sister made stencils for the Greek letters that we painted on with fabric paint. I added pink leggings to the outfit and painted our faces with the help of my older sister and voila! Python Nu Kappa sorority sisters!


My little sister made stencils for most of the family so we could all be part of a sorority or fraternity at Monsters University. Stay tuned for a post featuring all her amazing creations!

I even started the custom Monsters University theme from the start with the invitation. I created it all by myself. If you can't tell I'm a tiny bit proud of myself.


Pumpkin Mike Wazowski

Here is another DIY piece of Monsters University decor that tied the theme together with Halloween. My little sister and I made Mike Wazowski out of a pumpkin.


For those of you that don't know Mike Wazowski is the little one eyed green guy that starred in Monsters Inc and Monsters University along with Sully the inspiration for my DIY piñata. You can find the post with detailed instructions here.


I started with yet another fake pumpkin that we purchased last year after the holiday season.


I then spray painted it with some left over spray paint that a friend had leftover from a previous project. I love free craft supplies! There was just the perfect amount to finish covering the whole pumpkin.


My sister then painted the face on the pumpkin. 


A simple and easy addition to our Monsters University Party decor. It is also a great addition to our Halloween decorations that we can use again and again every year.

Friday, October 25, 2013

My adventure in party planning

This month I took on the rather daunting job of planning and hosting my daughter's second birthday! I can't believe my baby is two! I tried to keep things simple, but I got a little bit away from myself. During a bout of pinning I came across a pin of how to make your own piñata and thought "that doesn't look that hard." So I decided then and there I would make the piñata for my daughter's party. Truth be told it was very easy just very time consuming. Here are step by step instructions for how I did it.


Here is the finished product!

The theme was Monsters University and costumes were encouraged. I love that my daughter's birthday is in October and a costume party seemed perfectly logical! I also created both of my daughters and my costume with some help from my sisters, but that is for a later post. This piñata was inspired Sully of Monsters Inc and Monsters University. He is the big blue and purple monster.


Step one: 
Find a cardboard box as big as you want the piñata to be.


Step two:
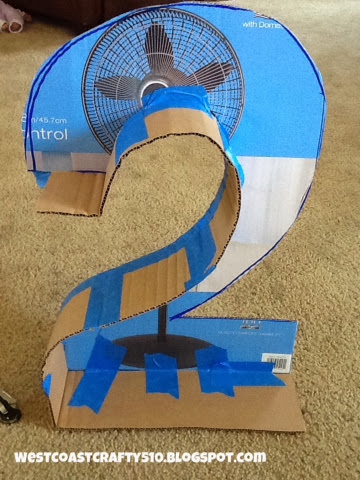
Trace the shape of the piñata on one side. I chose to do the number 2 because it was my daughter's 2nd birthday.


Step three: 
Cut through both sides of the box to create two cut outs of the shape of the piñata.


Step four: 
Cut several strips of cardboard that are the same width and begin taping them to one side of the piñata to create a three dimensional shape.


Step five:
Continue taping the inside, but don't do the entire shape or you won't be able to tape the inside for the back side of the piñata.


Step six:
Begin taping the back of the piñata to the strips that are attached to the front of the piñata.


Step seven: 
Continue taping strips of cardboard all around the remainder of the shape until completed. Don't forget to leave an opening to fill the piñata with candy.


Step eight:
Paint the entire piñata the base color. I used spray paint to make it a quick job.


Step nine:
Begin cutting strips of tissue paper and cutting fringe into the strips and glueing to the piñata.


Since I was modeling this piñata after Sully of Monsters Inc. and Monsters University it was blue with lavender spots. I cut lavender paper ovals and glued lavender tissue paper fringe to them and glued it to the piñata.


Keep on covering the entire piñata with tissue paper fringe until completely covered.


Step ten: 
Fill with candy. Don't get too emotionally attached since the point of the piñata is to beat it to a pulp to get to the candy. Enjoy!


Wednesday, October 16, 2013

No Carve Pumpkin

Hello there! Guest blogger here! My name is Chantelle. I am Antoinette's little sister. We are in the process of creating a sister blog but in the mean time I had something that I wanted to share right away since it is the season for carving pumpkins! 

This post is a work in process, but we wanted to give you all a sneak peek so you can get your pumpkin decorating on! This is a pumpkin decorated with gold thumb tacks.


Here's what you need:

Thumbtacks. Purchased from the 99 cent only store.


A pumpkin. This is a fake one we got on sale last year after the holiday season. 


Printed out random font monogram


Tip: if you don't have carbon transfer paper or don't want to pay for it just shade with a pencil on the back side on the lines u are going to trace.


Tape it onto ur pumpkin and trace the letter. It doesn't have to be perfect just there as a kind of guide


Here you can see a light pencil outline.


Begin sticking in the thumbtacks.


Wasn't sure what my intention was I just got started pressing the thumbtacks into the foam and found that it looked pretty cool when they were overlapping just a bit like scales


Just kind of work ur way around filling in the letter and if u don't like the way the thumb tacks are laying on top of each other it's easy enough to move them around


Try to cover up ur old holes as much as possible, but they are really so tiny you can't even notice them. However, it may be because I'm using a black pumpkin, but still u can't even tell. If you're using a painted pumpkin then u can just touch it up with the same color paint


Finished. A really fast and easy project. The whole process took about only 30 minutes. 

Some variations could be made using different colored pumpkins. You could also try spray painting the heads of the tacks different colors. 

If you decide to do this easy project I would love to see your pumpkins. Email them to antoinetterbrown@gmail.com and I might feature them in this post!

Happy crafting!

Friday, October 4, 2013

Shutterfly my favorite photo site and app

I got this wonderful personalized card free from Shutterfly by being subscribed to their emails. They always have great free deals. My favorite is the free 101 4x7 photo prints. You pay for shipping, but I have the Shutterfly app on my phone and iPad so it makes printing all my pictures so convenient and easy! I like to keep my free cards generic so that I can use them for anyone. Love the deals that they have on photobooks and custom photo projects!


5x7 Folded Card
View the entire collection of cards.